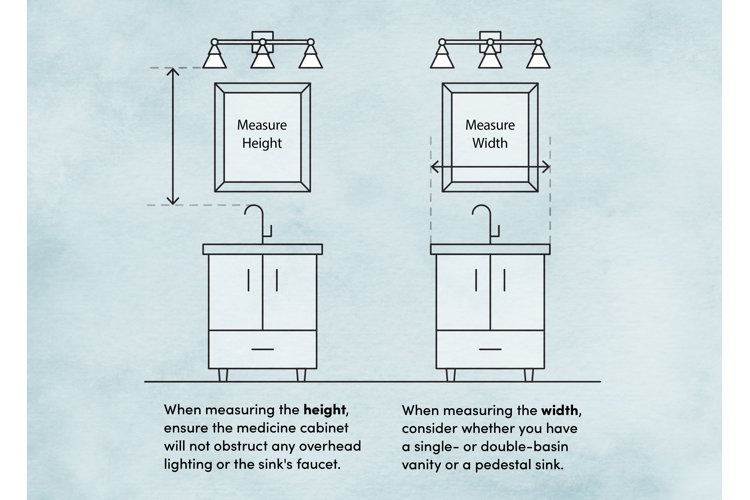
Measure wall opening, studs, clearances, and user height to size your medicine cabinet.
You want a cabinet that fits, lines up with your vanity, and opens without hitting lights or walls. In this guide, I show you how to measure for medicine cabinet like a pro. I cover rough openings, stud spacing, door swing, and height. I include real job tips, clear steps, and easy checks so you avoid costly mistakes.
What to know before you measure
A medicine cabinet looks simple. The measuring is not. A few key terms help:
- Overall size is the outside size of the unit or mirror frame.
- Rough opening is the hole in the wall a recessed unit slides into.
- Recess depth is how deep the body sits inside the wall.
- Swing arc is the space the door needs to open without hitting anything.
Gather simple tools first:
- Tape measure, pencil, blue tape, and a small level.
- Stud finder and a rare-earth magnet for drywall screws.
- Square, utility knife, and a flashlight.
Do a quick safety scan:
- Use the stud finder for live wires and pipes.
- Look for vents, switches, and outlets near the spot.
- Note tile edges and grout lines if the wall is tiled.
This base work makes the next steps fast and clean. It also reduces patch work later.

Step-by-step: how to measure for medicine cabinet
Use this simple path. I use it on every bath job.
-
Pick a mount type
Decide on recessed or surface-mount now. It changes every measure that follows. -
Find the studs and hazards
Scan the wall with a stud finder. Confirm with a small nail or magnet. Mark stud centers and edges. Note any pipes or wires. If you hit a mess behind the wall, plan for surface-mount. -
Set a centerline
Mark the vanity centerline on the wall. If there are two sinks, mark the center of each. This keeps the cabinet aligned to your space, not to random studs. -
Choose a target height
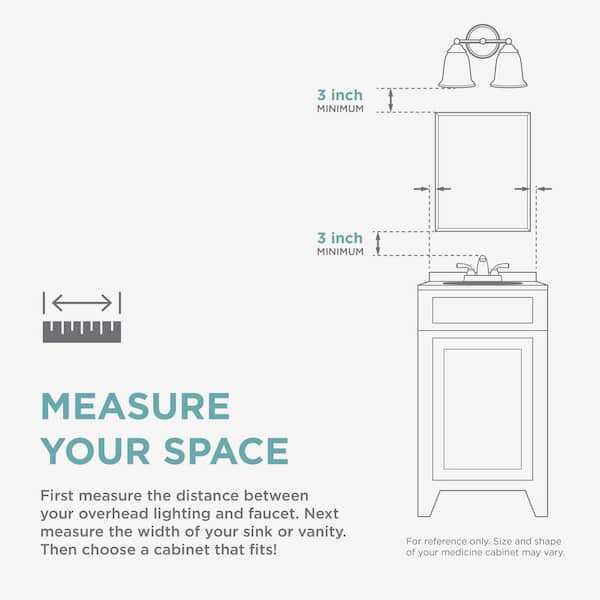
Most users want the mirror top near 72 to 78 inches from the floor. Set the center of view near 60 to 64 inches. Mark a bottom line 4 to 8 inches above the faucet tip. This avoids splash and still works for kids. -
Measure the space for surface-mount
If you go surface-mount, measure the clear wall width and height above the faucet and below the light. Open your tape to the cabinet width you like. Swing the tape to test door arc. Check it will not hit the light, wall, or a tall faucet. -
Measure the space for recessed
If you go recessed, measure stud-to-stud width where you want the unit. Common bays are 14.5 inches clear in 16-inch on-center walls. Some bays are 22.5 inches in 24-inch on-center walls. Then measure the wall cavity depth. A 2×4 wall has about 3.5 inches of depth, minus drywall and any tile mud. You want at least the cabinet body depth plus a little air. Note any blocks, vents, or pipes. If depth is tight, pick a slim body or surface-mount. -
Size the rough opening
Read the spec sheet for rough opening width, height, and depth. If you do not have it yet, use a guide number. Many 20 x 26 inch recessed units need a rough opening near 14 x 24 inches, with 3.5 to 4 inches of depth. Add 0.25 to 0.5 inch of shim space around for an easy fit. Write these numbers on the wall with your pencil. -
Check door swing and mirror overlap
Hold a piece of cardboard the size of the door. Hinge it on the wall. Swing it open. Watch clearances near lights, side walls, towel bars, and GFCI outlets. Make sure the door can open at least 90 degrees. More swing is better for access to shelves. -
Confirm alignment with the vanity
The cabinet should sit centered to the sink or vanity. A good look is a cabinet width at 70 to 80 percent of the vanity width. For double sinks, one cabinet per sink or a wide, triple-door unit centered on the full vanity both work. Use blue tape to mock the final size. -
Document everything
Write final numbers: overall size, rough opening, depth, bottom height, top height, hinge side, and centerline. Take a photo with your phone. This record saves time during install.
Small math that helps:
- Eye level check: user heights vary. Aim to keep the mirror center near 60 to 64 inches.
- Rough opening width: cabinet body width plus 0.25 to 0.5 inch shim space.
- Bottom gap: faucet tip to bottom of cabinet at least 4 inches, 6 inches is safer with tall faucets.
This is how to measure for medicine cabinet in a clean, repeatable way. It works for both new builds and remodels.

Sizing rules of thumb and ergonomic height guide
These rules keep the look balanced and the use easy.
-
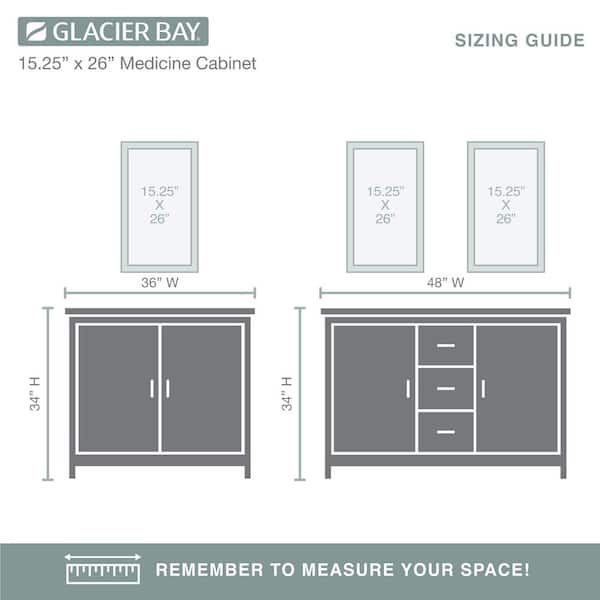
Width target
Pick 70 to 80 percent of the vanity width. A 36-inch vanity looks great with a 24 to 30-inch cabinet. If your sink is off-center, size to the sink basin, not the vanity edge. -
Height target
Keep the top near 72 to 78 inches off the floor. Set the center near eye level for the main user. In shared baths, split the difference so all users see well. -
Bottom clearance
Leave 4 to 8 inches from faucet tip to cabinet bottom. This avoids bumps and splash. With tall or arc faucets, use 6 to 8 inches. -
Depth and door swing
Most recessed bodies are 3.5 to 4.5 inches deep. You need full door swing without hitting the light, wall, or tall bottles on the counter. Leave at least 3 to 4 inches of side space for the swing. -
Universal design notes
If a seated user needs access, keep the mirror view line near 40 inches from the floor. Keep the top of the reflective area no higher than 74 inches. Keep controls easy to reach.
These ideas make how to measure for medicine cabinet feel simple and clear. They also help avoid style regrets later.

Recessed vs surface-mount: how to choose and measure
Recessed units look flush and sleek. They need a clean wall cavity and careful cuts. You must confirm studs, depth, and hazards first. Surface-mount units sit on the wall. They work great when pipes or wires block a recess. They also add shelf depth, which many people like.
When you choose recessed:
- Confirm a clear bay and depth of at least the body depth plus drywall.
- Size the rough opening per the spec sheet, with a small shim gap.
- Check for tile edges. Plan a trim ring or caulk line that looks clean.
When you choose surface-mount:
- Measure wall space for width and height under the light.
- Check side clearance for full door swing.
- If the side of the cabinet is visible, consider a finished side kit.
Framed, frameless, and mirrored interiors change look and size. Frameless looks modern but needs cleaner cuts. Framed units can hide small gaps at the wall. Lights built into the cabinet need extra wire planning and a switched power feed. If you want that, mark a wire path now.
Both types follow the same core check list. The same is true for how to measure for medicine cabinet across brands. The right choice comes down to your wall, your style, and your time.

Tricky walls and real-world fixes
Old plaster walls can be deep or uneven. Tile brings layout issues. Studs are not always where you want them. Here is how I deal with that on site.
-
Tile walls
Mark cuts on painter’s tape so you see lines. Score the glaze with a glass cutter. Use a multi-tool to clean corners. Support tile edges so they do not chip. Use a trim ring if your cut is not perfect. -
Plaster and lath
Drill small test holes and peek inside with a light. Lath can splinter. Use a fine blade and cut slow. Add blocking between studs if you need screws where there is no stud. -
Studs off-center
Do not force the cabinet off the sink center. Pick a narrower cabinet that fits the stud bay. Fill side gaps with finished filler strips. Or use a surface-mount and center it to the sink. -
Shallow walls
If depth is short, use a slim cabinet body. Some are under 3 inches deep. Or go surface-mount and save the demo time. -
Wires and pipes
If you find wires or a vent, stop and plan. Call a pro if you must move them. Often, the fast win is a surface-mount unit.
These tips save time and mess. They also keep your project safe. This is the side of how to measure for medicine cabinet that people forget until demo day.

Real sizing examples and a simple worksheet
Here are quick, real-world cases.
Example 1: Small powder room
- Vanity: 24 inches wide, faucet height 10 inches.
- Space to light: 28 inches from countertop to light.
- Pick: 20 x 26 surface-mount.
- Bottom set 6 inches above faucet. Top lands near 72 inches.
Example 2: Standard bath, recessed unit
- Vanity: 36 inches wide.
- Stud bay clear: 14.5 inches, depth 3.5 inches.
- Pick: Recessed body 14 x 24 rough opening, door 20 x 26.
- Bottom 6 inches above faucet, center near 62 inches.
Example 3: Double vanity, wide unit
- Vanity: 60 inches with two sinks.
- Clear wall height: 34 inches between counter and light.
- Pick: 48-inch wide, three-door surface-mount.
- Keep at least 6 inches from faucets. Check door swing to lights.
Use this simple worksheet before you buy:
- Vanity width and sink centerline:
- Faucet height from counter:
- Desired bottom of cabinet above faucet:
- Stud-to-stud width at your target height:
- Wall cavity depth:
- Clear height under light:
- Side clearances to walls or mirrors:
- Hinge side preference:
- Final target width x height x depth:
Fill it in once. Shop with confidence after. This is the easiest way to lock how to measure for medicine cabinet into a clear plan.
Fast answers to common planning questions
These quick hits clear up the spots where people get stuck during layout.
How much space should be above the faucet?
Leave 4 to 8 inches from faucet tip to cabinet bottom. Tall arc faucets need closer to 6 to 8 inches.
Can I recess a cabinet in a 2×4 wall?
Yes, if you have at least about 3.5 inches of cavity depth and no pipes or wires in the bay. Pick a body that fits and add a small shim gap.
Should the cabinet match my vanity width?
It should not match in most cases. Aim for 70 to 80 percent of vanity width for a balanced look.
Common mistakes and pro tips
I see the same errors over and over. These are easy to avoid.
-
Ignoring the light
People buy tall cabinets that hit the light bar. Measure from the counter to the light first. This sets your max cabinet height. -
Skipping door swing checks
Many doors hit a side wall or sconce. Mock the door with cardboard and swing it. Change hinge side if needed. -
Forgetting rough opening size
The mirror size is not the hole size. Always read the spec sheet for rough opening before you cut. -
Not checking for studs and wires
Cutting blind can be costly. Scan, drill a small probe hole, and look. If you see pipes, stop and switch to surface-mount. -
Mounting too low
Splash and knuckle bumps are no fun. Keep 4 to 8 inches above the faucet and you are safe.
Pro tips from the field:
- Use blue tape to frame the size on the wall. Stand back and look.
- Keep the mirror center near 60 to 64 inches for shared spaces.
- If the wall is out of plumb, shim the cabinet body. Then caulk the tiny gap for a clean line.
- If you must shift off center by an inch, hide it with even side sconces or a framed mirror style.
These small steps make how to measure for medicine cabinet smooth and stress free.
Buying checklist based on your measurements
Before you order, match these points to your notes.
- Mount type: recessed, surface-mount, or semi-recessed.
- Final size: width x height x depth that fits your space.
- Rough opening size and depth for recessed units.
- Hinge side and door count to suit swing and reach.
- Shelf style, mirrored interior, and lighting needs.
- Side kits or fillers if surfaces will show.
- Mounting hardware and blocking needs behind drywall.
If each box checks out on paper, your install day will be fast. This is the final step in how to measure for medicine cabinet before you click buy.
Frequently Asked Questions of how to measure for medicine cabinet
What is the standard height for a medicine cabinet?
Most people set the top between 72 and 78 inches from the floor. Keep the mirror center near 60 to 64 inches for easy viewing.
How wide should a medicine cabinet be over a 36-inch vanity?
A good range is 24 to 30 inches wide. That keeps the look balanced and avoids crowding lights.
What rough opening do I need for a 20 x 26 cabinet?
It depends on the brand. Many need a rough opening around 14 x 24 inches, but always check the spec sheet.
Can I install a recessed cabinet on an exterior wall?
You can, but check for insulation, vents, or pipes. Depth can be tight, so confirm cavity space or choose surface-mount.
How do I measure depth for a recessed unit?
Measure from the back of drywall to the face of the sheathing or block. You want at least the cabinet body depth plus a little wiggle room.
What if my studs are not centered on the sink?
Pick a unit that fits a single stud bay and use fillers, or go surface-mount. Always center the mirror to the sink, not to the studs.
How high above the faucet should the bottom of the cabinet be?
Leave at least 4 inches, and 6 to 8 inches is safer with tall faucets. This prevents bumps and splash.
Conclusion
You now know how to measure for medicine cabinet the right way. Map the studs, set a centerline, pick a height, and check door swing. Size the unit to the vanity and the wall, and confirm the rough opening before you cut. With a few notes and a bit of tape, your choice will fit and look great.
Take ten minutes today to fill the worksheet and tape the outline on your wall. You will buy with confidence and install without surprises. Want more practical guides like this? Subscribe and share your project questions in the comments.